Quickstart
Follow these steps to quickly start using Vizard’s API.
1. Obtain Your API Key
To interact with Vizard’s API, please make sure you’re on a paid plan, as API access is only available to paid users.
Here are the steps to get an API key:
- Log in to your Vizard account.
- Make sure you’re on a paid plan (API access is only available for paid users).
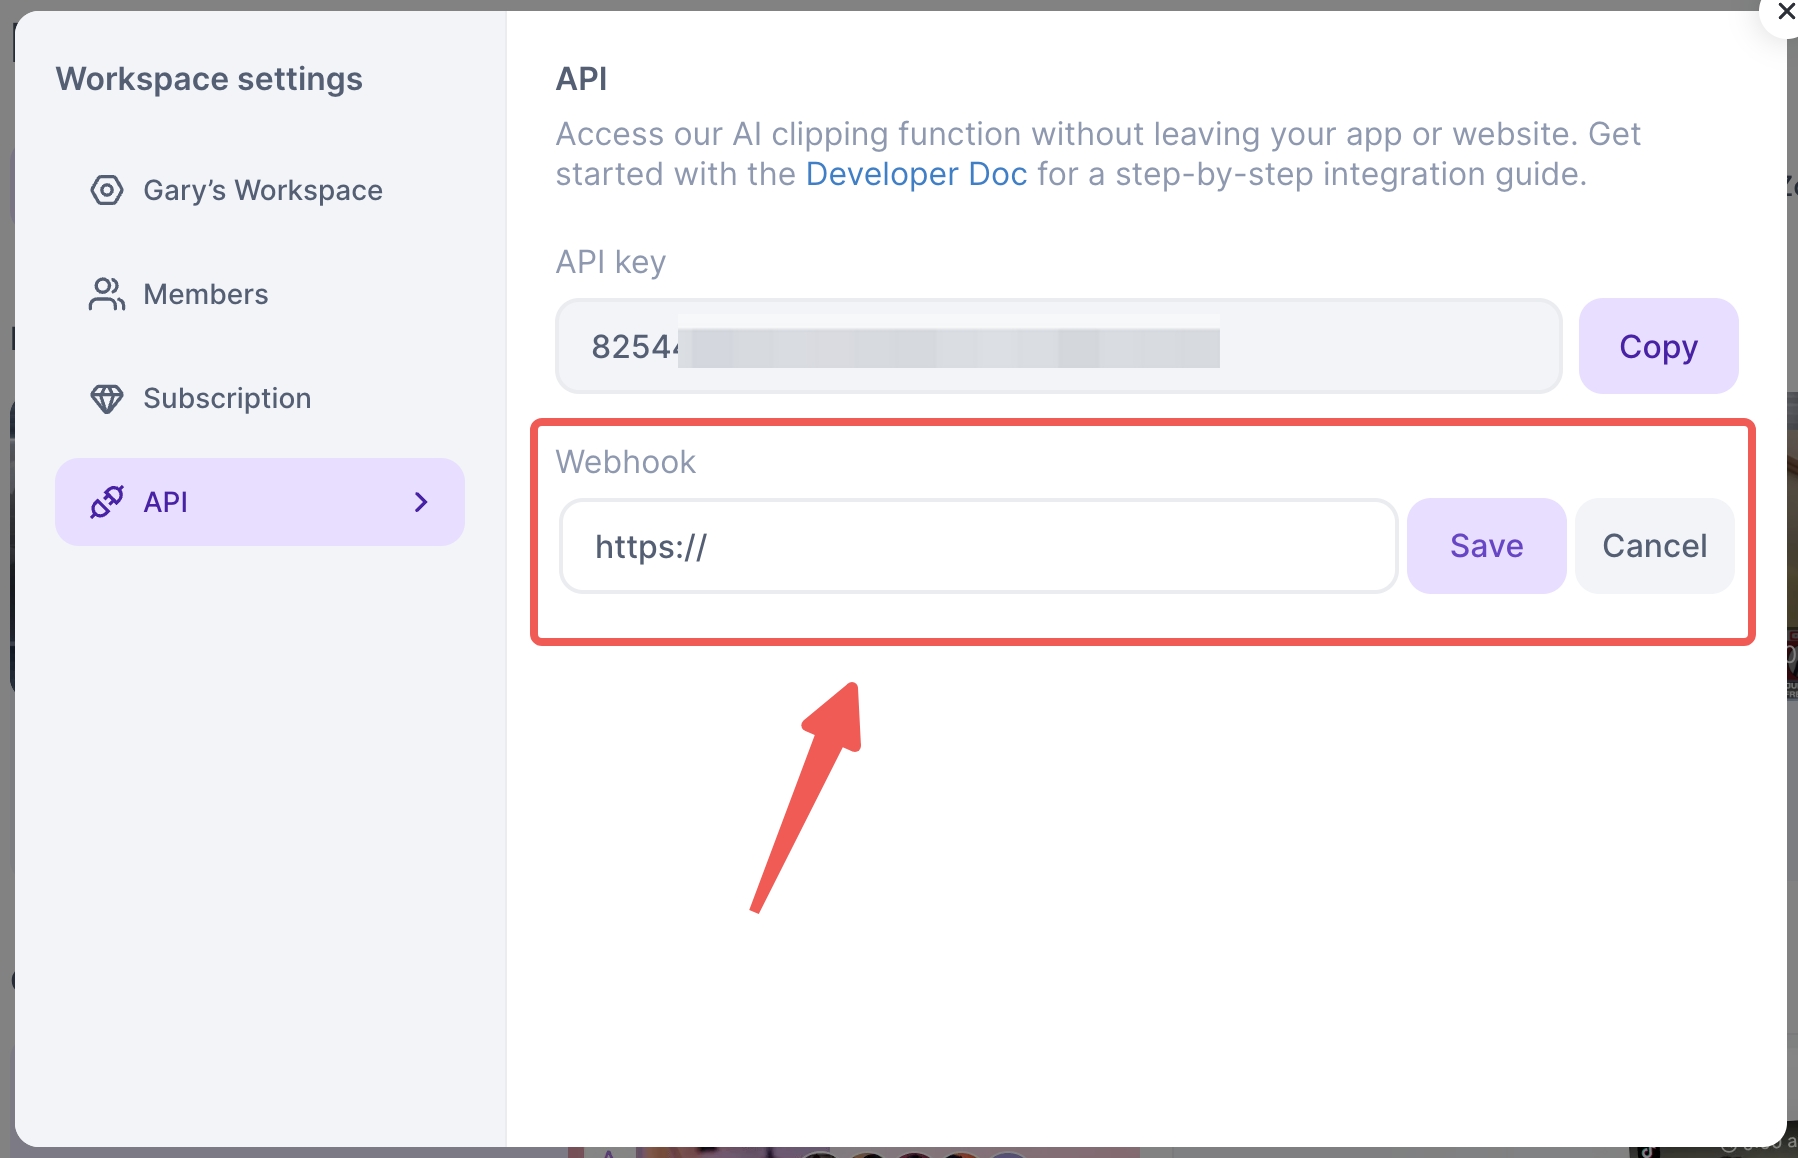
- Go to your Workspace Settings.
- Click on the API tab.
- Click Generate API Key to create a new key.
- Copy and securely store your API key for use in your integrations.
2. Submit a Video for Clipping
Send your video to the API to start processing. Vizard’s API supports video uploads from multiple sources, including: remote video files, YouTube, Google Drive, Vimeo, and StreamYard.
curl -X POST https://elb-api.vizard.ai/hvizard-server-front/open-api/v1/project/create \
  -H "Content-Type: application/json" \
  -H "VIZARDAI_API_KEY: YOUR_API_KEY" \
  -d '{
    "lang": "en",
    "preferLength": [0],
    "videoUrl": "https://www.youtube.com/watch?v=OqLfw-TzzfI",
    "videoType": 2
  }'
import requests
headers = {
"Content-Type": "application/json",
"VIZARDAI_API_KEY": "YOUR_API_KEY"
}
data = {
"lang": "en",
"preferLength": [0],
"videoUrl": "https://www.youtube.com/watch?v=OqLfw-TzzfI",
"videoType": 2
}
response = requests.post(
"https://elb-api.vizard.ai/hvizard-server-front/open-api/v1/project/create",
headers=headers,
json=data
)
print(response.json())import axios from 'axios';
const headers = {
'Content-Type': 'application/json',
'VIZARDAI_API_KEY': 'YOUR_API_KEY'
};
const payload = {
lang: 'en',
preferLength: [0],
videoUrl: 'https://www.youtube.com/watch?v=OqLfw-TzzfI',
videoType: 2
};
axios.post('https://elb-api.vizard.ai/hvizard-server-front/open-api/v1/project/create', payload, { headers })
.then(res => console.log(res.data))
.catch(err => console.error(err));Note:
This call returns a projectId, which you’ll use to retrieve your clips in next step.
3. Retrieve Your Clips
After initiating a video processing request, you have two options to retrieve your clips: Polling or Webhook. For Polling, we recommend setting the polling interval to 30 seconds.
Processing time usually ranges from a few minutes to tens of minutes, depending on the video’s length and resolution. Videos in 4K resolution require significantly more time compared to those in lower resolutions. For example, a 30-minute talking-head video typically generates 20+ clips and takes about 10 minutes to process.
3.1 Method A: Polling (Check Status Periodically)
You periodically send a request with the provided projectId to check if clips are ready.
curl -X GET https://elb-api.vizard.ai/hvizard-server-front/open-api/v1/project/query/{projectId} \
  -H "VIZARDAI_API_KEY: YOUR_API_KEY"
import requests
headers = {
"VIZARDAI_API_KEY": "YOUR_API_KEY"
}
project_id = "your_project_id"
response = requests.get(
f"https://elb-api.vizard.ai/hvizard-server-front/open-api/v1/project/query/{project_id}",
headers=headers
)
print(response.json())import axios from 'axios';
const headers = {
'VIZARDAI_API_KEY': 'YOUR_API_KEY'
};
const projectId = 'your_project_id';
axios.get(`https://elb-api.vizard.ai/hvizard-server-front/open-api/v1/project/query/${projectId}`, { headers })
.then(res => console.log(res.data))
.catch(err => console.error(err));Replace the GET parameter
projectIdwith the projectId you received in Step 2.
3.2 Method B: Webhook (Automatic Notification)
Alternatively, configure a webhook URL in workspace before submitting a video to automatically get notified once clips are ready. The API will POST the clips’ metadata to your webhook endpoint.
🎉 You’re all set! Integrate this workflow into your applications to automate and scale your video clipping effortlessly.
Updated over 1 year ago